According to many experienced cable installers, fail to pull cable properly will eventually lead to a series of network problems and disasters. Since installing cable is a routine yet fundamental task, its importance thus cannot be underestimated. Therefore, to ensure a smooth and efficient cable pulling process, installers should get fully prepared for the work, and take various factors into consideration to avoid damaging the cable. In this article, we try to explain how to prepare for pulling fiber optic cable and as well offer suggestions to help get the work done.
Before-Pulling Considerations
Preparation always serves as the very primary phase of the whole installation task. It can impact other stages in the process of pulling fiber optic cable. To get well-prepared, the following factors must be valued.
1. Avoid Cable Damage
The first step in pulling fiber optic cable is to measure and cut the material. Inaccurate measurements can result in disastrous issues. The glass fiber within the cable is fragile and requires greater care during the process of cable pulling. Damage to cable can come in many forms, and the common broken fiber is difficult to detect. The most common form of damage, a broken fiber, is also the most difficult to detect.
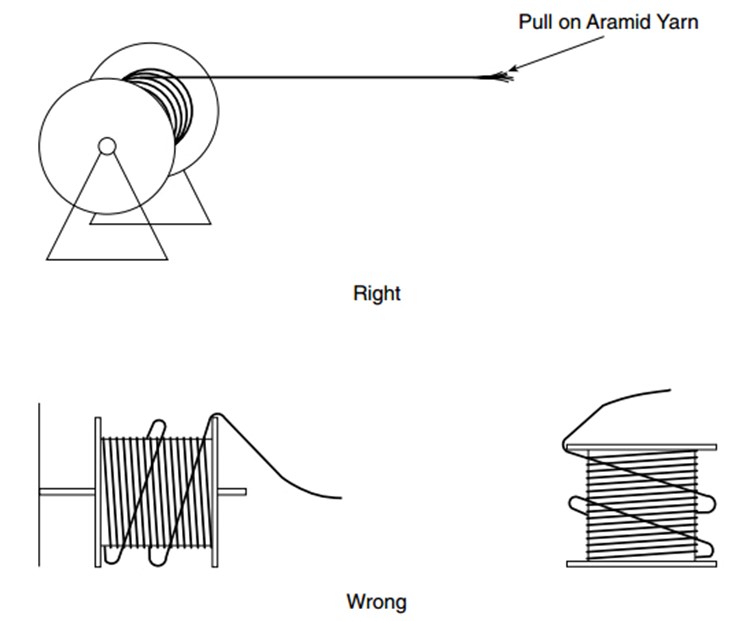
2. Despooling Cable Properly
Improper pulling and despooling of the cable can cause optical cordage failure. One should also avoid cable twist when despooling fiber optic cable to prevent stressing the fibers. Therefore, the cable should be reeled off the spool, not spun over the edge of the spool. This will eliminate cable twist, which will make coiling much easier.
3. Pulling Force
The pulling force must be kept below a designated limit for the specific cable being installed. This is usually 600 pounds for outside plant (OSP) cable and 300 pounds or less for other cables. The pulling force must also be kept uniform. When using power equipment to pull OSP cable, tension monitoring equipment or breakaway swivels must always be used.
4. Bending Fiber Too Tightly
Another most common problem is bending the fiber on too tight a radius. A minimum bending radius of 10 cable diameters must be maintained over long-term, static conditions. When the cable is placed under a tensile load while being pulled, a minimum of 20 cable diameters is recommended.
Which Jacket Type Is Right?
Indoor (Plenum): The cable is rated for all indoor installations, including plenum rated spaces. A cable rated for plenum installation will have low-smoke characteristics.
Outdoor: Outdoor cables are filled with a water blocking jell and are rated for all outdoor applications except for “direct bury”. This cable is suitable for underground installation in conduit, overhead lashed to a guy wire, or secured to a building or other permanent outdoor structure. The only difference between outdoor (jell-filled) and direct bury cable is that the latter has an added overall metallic sheath which gives it protection from rodents.
Indoor/Outdoor: Indoor/Outdoor cables are approved for use in underground conduits, even if the possibility of water infiltration exists. Indoor/Outdoor cables are not recommended for aerial installations. This cable has an overall PVC sheath and is not rated for plenum spaces.
Procedures for Pulling Fiber Optic Cable
Step One: Inspect the cable run to ensure there are no sharp bends or corners that exceed the minimum bend radius of the fiber.
Step Two: In many runs, if the pulling distance is short enough and the pathway straight enough, fiber-optic cable can be pulled by hand, without the use of special equipment. However, first make sure the pull does not exceed the tensile-loading limit established by the manufacturer for installation.
Step Three: When additional mechanical force is needed for a pull, use external pulling grips. This device locks onto and tightens around a cable as a tensile load is applied. The load is applied to the strength members of the cable rather than the optical fiber, itself.
Step Four: With some cables, such as outside-plant cable, it may be necessary to attach the pulling grip to strength members that surround the cable core as well as the outer jacket. This is done by sliding the grip past the end of the cable and then cutting the cable jacket back to expose the strength members.
Step Five: Use a swivel when pulling fiber optic cable to make sure twists in the pull rope are not translated to the fiber-optic cable. Also, use a tension meter to monitor the tension being applied to the cable during the pull.
Step Six: After pulling fiber optic cable, cut off approximately 10 feet of cable from the pulling end to remove any portion of the cable that may have been stretched or damaged during installation.
Note: Leave enough cable at either end to reach the work-area and closet terminating locations. You are now ready to terminate or add
fiber connectors.
Conclusion
Pulling fiber optic cable is a dispensable and rather important part in fiber cable installation. During the process, installers should avoid cable damage, despoiling the fiber properly, and take pulling force into account. Since the real fiber pulling environment could be more complex, the recommended procedures we offered above is a simple guideline, and I hope it can be helpful.